Green Chicken Pizza?

salty nutty bars 004

Not green eggs and ham.

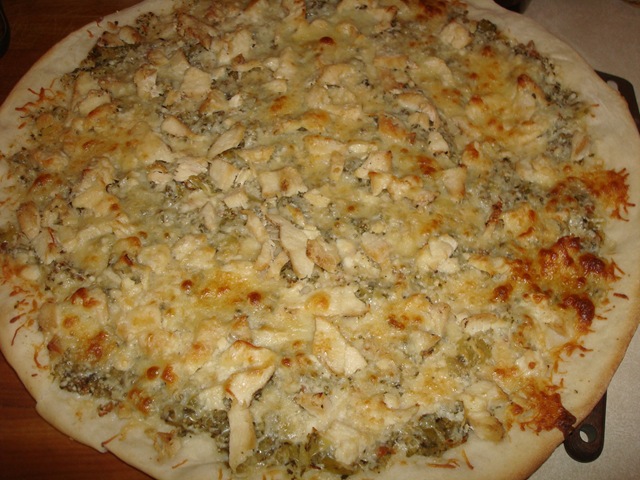
Would you eat green salsa and chicken pizza?

You should give it a try –  it’s really yummy!

green pizza

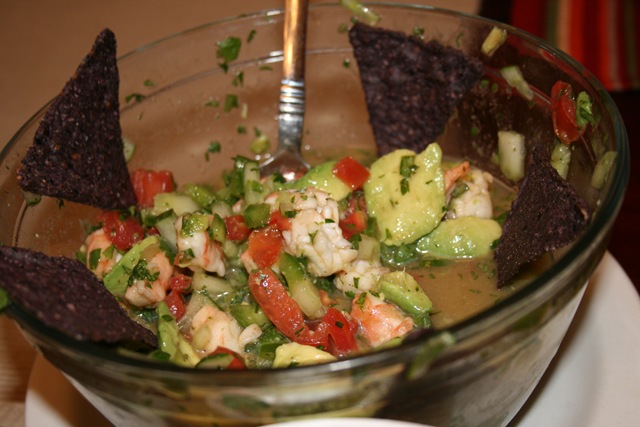
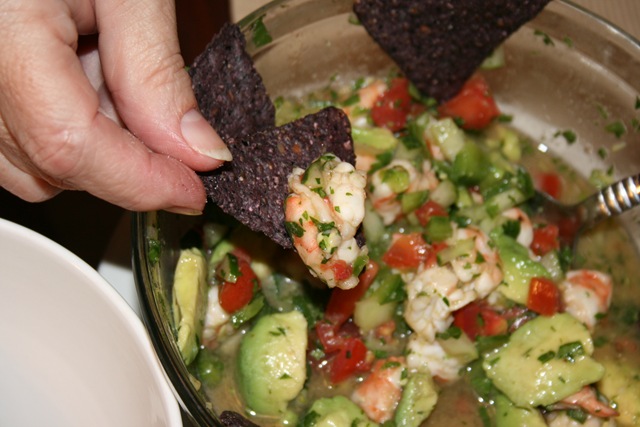
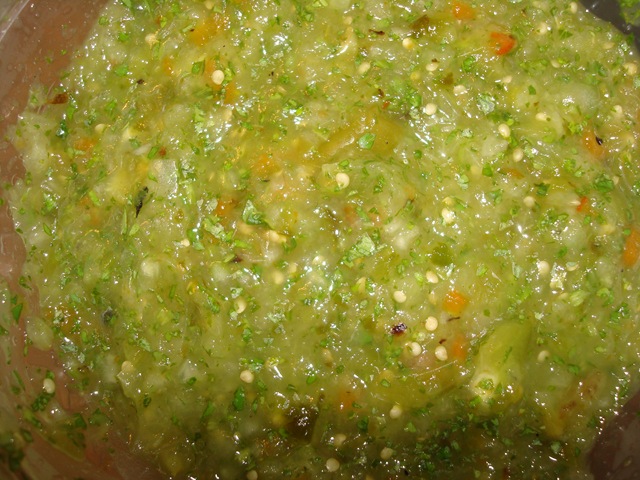
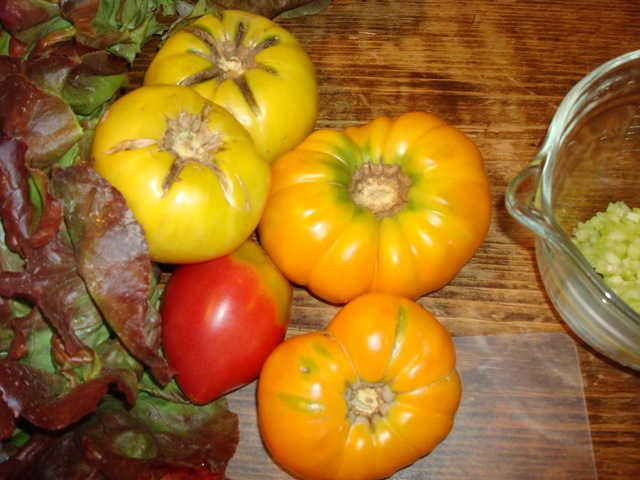
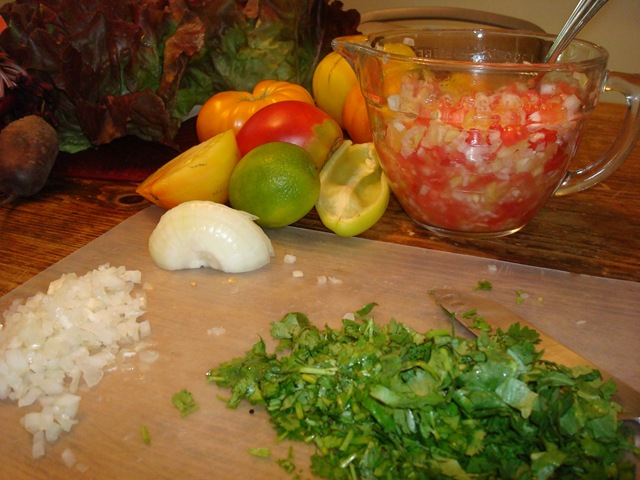
I started off making a salsa verde, the recipe is here. And then I made a pizza dough- you can use your favorite recipe or… use this one.

Ingredients:
5 cups bread flour
2 tsp sea salt( or less- I like the salty yeasty,EVOO flavor)
1 1/2 cups warm water (105 F)
1 1/2 TBS yeast
1/4 cup good quality olive oil
Method:
Proof yeast in half cup of water- you can add 1/2 tsp sugar to expedite this step.
In large bowl stir salt and 4 1/2 cups flour together and make a small well at the bottom of the bowl. Add warm water, olive oil and stir the flour just enough to moisten it, then add the foamy yeast and mix thoroughly with a wooden spoon . You may need to add a little more liquid at this point- the dough should be soft and slightly sticky.
Dust surface of counter with remaining flour and dump dough out. Knead for at least 10 minutes until dough is smooth and pliable. You may need to add a handful of flour – but not enough to dry out dough. Smooth , pliable,and slightly sticky is the description of what you want at this point. Then form a ball and place in bowl that has been oiled, cover with plastic and let raise at least an hour til double in size. Now! Punch the dough down, knead gently for at least 5 minutes and let raise a second time until doubled again (around 45 minutes) this second raise is what gives the dough that stretchy, yeasty, Italian flavor. Don’t skip it!
At the end of second raising, shape into desired bread or roll out (or toss) for pizza. Allow to raise about 1/2 hour and bake at 350F until golden brown.

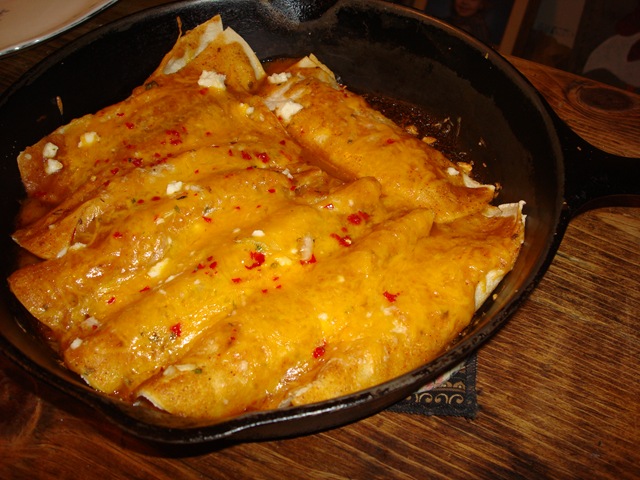
Next grill a large chicken breast.  I rubbed it with cumin and garlic and lemon pepper and then drizzled some olive oil on top and grilled it about 5 minutes each side.  Then tear into pieces if you are feeling a little aggressive, or just chop it into small pieces.  Smear the salsa verde over the pizza crust, sprinkle the chicken on top and add your favorite cheese.  I used mozzarella, romano, and Parmesan.  Drop some pepper rings or olives- or whatever you prefer on your pizza and bake at 375 degrees F for about 20 minutes or until golden brown.

This is really good pizza- and a nice break from red sauce.

Beach, ponies and really good food. PLUS a recipe for ceviche!

beach 029

Sitting on the dock of Chincoteague Bay… I love this picture.

We are here on Chincoteague Island- enjoying family time, food, the beach, the ponies and good food.  Did I mention the food?( It’s been really, really good!)

beach 006 beach 005

We left early Sunday morning- the sky was gorgeous- I put my camera on top of the car and clicked away.

beach 009 beach 010 beach 012

And the sky by the Bay Bridge was a beautiful blue.  (BTW- I LOVE the EZPass- you can just drive on through and even have your own lane on the other bridge!)

beach 013

We went to Island Creamery and had ice cream on the first night.

beach 001

Then we went to meet this beauty-

beach 002 beach 003 beach 004

who seriously wanted to nibble on my arm.

beach 007

Aidan decided he DID NOT want to ride on a pony.

beach 010 No- NO rides!

Then we ran about town for a while- shopping and buying (I’ll show pictures of our lovely yarn later).

And  then we had a wonderful meal for dinner of grilled pork shops, singing potatoes, steamed broccoli  and cheddar bay biscuits.

No pictures- we snarfed it down right quick.

BUT- I was watching Luke make a special appetizer, Shrimp ceviche.

The beauty of this dish is that you use citric acid to cook the shrimp.

Citric acid, as in lemon and lime juice.

beach 012

Luke made up his own recipe and he graciously offered to share it with us all.

Shrimp and Avocado Ceviche

3/4 lb of raw shrimp, deveined and cut into 1/2 inch pieces

Juice from 1 1/2 lemons

Juice from 1 lime

1 pepper- chopped (habenero, serrano, or your choice)

1 medium cuke, chopped

1 medium tomato, chopped and seeded

1 avocado, sliced into cubes

1/2 bunch cilantro, chopped

salt and pepper, to taste

Put shrimp into glass bowl and pour juice over it.

Stir well, add other ingredients and watch the shrimp turn pink!

Let sit in refrigerator for 3 hours, covered with plastic wrap.

Serve with blue corn chips and enjoy!


beach 015

Dip right in and take a bite of this Latin American dish.

Baking!!!

I spent the weekend baking.

I made some sourdough bread and braided it.

(but no picture.:( )

I made MORE bacon/peanut butter cookies and added a design so that they looked really pretty-

bacon reprised and enchiladas 005

bacon reprised and enchiladas 016 bacon reprised and enchiladas 017 bacon reprised and enchiladas 020

I like the way they look in the mason cookie jar!

And I made the bacon toffee/brittle but added some mixed nuts and cooled it on a black marble slab.  That looks very good and tastes, well, interesting and good.

bacon reprised and enchiladas 006 bacon reprised and enchiladas 011bacon reprised and enchiladas 009bacon reprised and enchiladas 015

And then I made salsa verde with tomatillos –

bacon reprised and enchiladas 021 bacon reprised and enchiladas 022

and used it to season pork enchiladas.

bacon reprised and enchiladas 024 bacon reprised and enchiladas 025

Shredded pork enchiladas and cheese and onion enchiladas.

Here are a couple of recipes if you are interested.

Salsa Verde

10 medium sized tomatillas, peeled and washed.

1/2 chopped onion

2 jalapeno peppers,seeded, roasted, peeled, chopped

1 small bunch cilantro

2 TBS lime juice

1 tsp sugar

salt and pepper

Broil the tomatillos, cut in half and the peppers until browned under the broiler.

Put all ingredients in processor for just a few turns, until everything is uniform in size and mixed, but not smooth.

Use with enchiladas or with corn chips as a dip.

::::::::::::::::::::::::::::::::::::::::::::::::::::::::::::::::::::::::::::::::::::::::::::::::::::::::::::::::::::::::

Brown enchilada sauce

1/4 cup vegetable oil

2 TBS all purpose flour

1 teaspoon each of cumin, garlic and oregano

2 TBS chili powder

2 cups chicken broth, or water

Heat oil in cast iron skillet (or heavy bottom pan), add flour and stir for about 3 minutes on medium heat, making a roux.  Stir until lightly browned and add spices, stirring constantly so they don’t clump or burn. Add broth or water slowly, stirring until your paste becomes a sauce and cook over low heat until it comes to a slow boil.  Boil, stirring until some of the liquid evaporates and you have a luscious gravy.

Pour a little in the bottom of your enchilada pan, roll up your cheese and green onions or shredded pork or chicken with a little salsa verde into warm corn tortillas and place next to each other, rolled end down.  Pour sauce over top and bake at 350 F for about 12 minutes – until heated through and bubbly- sprinkle cheese on top and broil for another couple of minutes and YUM- Enchiladas!

Oatmeal and Babies

oatmeal!!! 002 My son and daughter in law are expecting another son in October.

I love being a grandmother- it is one joy after another- without most of the hard work and decisions that come into play as a parent.

I am here to engage in play and enjoyment.  I get to receive lots of hugs and kisses and happy to see you smiles.  And I have the distinct joy of spending time in the lives of my children and the next generation just through babysitting and skyping.

And I have Allyson’s foster children to love as well.  Aiden is headed to becoming her son.  And now, she has another foster baby to love.  And that means I get to hold the baby and enjoy.  And believe me- I AM enjoying!

oatmeal!!! 003 So is Cynthia!

So, I am getting in some serious practice for October!

And now onto the oatmeal portion of this post.

I like oatmeal.

As a cereal, certainly, but even more as an ingredient.

Today I made oatmeal cookies and granola.

They both turned out great- and not a slice of bacon in the recipes!

oatmeal!!! 006

Here’s the approximate recipe for the granola.

Ingredients:

6-8 cups of  old-fashioned oatmeal

1 cup pecans

1 cup sliced almonds

1 cup cashews

1 cup walnuts

1cup raw sunflower seeds

1 cup coconut

1 pinch sea salt

1 cup honey

1 cup canola oil

1/2 cup maple syrup

Preheat oven to 250 F degrees.

Stir together dry ingredients.

Stir together wet ingredients.

Stir together ALL ingredients, place in oven and stir every 30 minutes for about oatmeal!!! 008oatmeal!!! 009

2 1/2 hours or until golden brown.

Take out of oven and continue to stir until cooled down.

Place in air tight container.

oatmeal!!! 011

I ended up with about 5 1/2 quarts of granola.

You can use your favorite nuts in this mix-  add a little more of this – a little less of that and make the kind of granola you like the best.  I like mine really nutty and not too sweet.

And yet another bacon adventure-

Bacon toffee, anyone?

Ingredients
1/2 lb bacon
1 stick butter
1/4 cup water
1 cup sugar
salt
Instructions
Cook the bacon in a skillet. Let it cool on paper towels to remove the excess grease, then chop it into bits. The pieces should be about the size of a fingertip. Set aside.
Put the water, butter, sugar, and a pinch of salt in a heavy saucepan over medium-high heat. Stir constantly until the water has boiled off (the mixture will get very bubbly/frothy first) and the mixture turns a deep golden tan color.
Remove from heat, stir in bacon bits, and quickly spread toffee on a silpat or well-oiled baking sheet or piece of marble.
Let cool, then break toffee into pieces by covering it with plastic wrap and pounding it with a knife handle or toffee hammer.
Toffee stores in refrigerator indefinitely.

Ingredients

½

pound bacon

1

stick butter

¼

cup water

1

cup sugar

one pinch salt

Preparation

Step 1

Cook the bacon in a skillet or in the microwave on paper towels.

Step 2

Let it cool on paper towels to remove the excess grease, then chop it into bits. The pieces should be about the size of a fingertip. Set aside.

Step 3

Put the water, butter, sugar, and a pinch of salt in a heavy saucepan over medium-high heat. Stir constantly until the water has boiled off (the mixture will get very bubbly/frothy first) and the mixture turns a deep golden tan color.

Step 4

Remove from heat, stir in bacon bits, and quickly spread toffee on a silpan or well-oiled baking sheet or a piece of marble.

Step 5

Let cool, then break toffee into pieces by covering it with plastic wrapand pounding it with a knife handle or toffee hammer.

Step 6

Toffee keeps in refrigerator indefinitely.

………………………………………………………………………………………………………

I have been moved to another site, some people couldn’t comment  on my last one.  So no pictures yet-  this is mainly a test post.

Would you please comment so I can tell if it is working correctly?

Thanks!

Peanut butter and bacon cookies- a recipe “taylor”-made.

Sorry Luke, I couldn’t help myself.  I love these cookies and wanted to share the recipe.

Some of my family has a bacon obsession.  We think any recipe would be better if you only add some bacon.  My great nephew Taylor probably is most afflicted of  us all- his facebook posts have a common bacon theme when he posts about food.   After he posted a picture about carmelized bacon on top of his ice cream, I decided to make a peanut butter and bacon cookie.

There were already a couple of recipes on the cooking blogs- so I kind of used bits and pieces from them and added them to my own tried and true peanut butter cookie recipe and using an entire pound of bacon made them up last week.

It was hard putting all that bacon into one recipe- Jordan snatched a piece before I got it all chopped up- but I wanted to try the cookies so minus one piece the pound of bacon went into the bowl.

The cookies are delicious.  The bacon is empowering rather than over powering and they are substantial and filling.  This is not a cookie for the faint of heart or vegetarians, admittedly– but if you like bacon and peanut butter- you might want to give this recipe a try.

( I didn’t tell my husband about the bacon and he raved about how good the cookies were… I gave a sample to my knitting group and they really liked them, but couldn’t identify the bacon immediately.  So- not sure if I want to take out some PB or add some more bacon.  I think I like them just the way they are.)

………………………………………………………………………………………………………….

Recipe

Ingredients:
1 lb bacon- fried, drained, crumbled ( reserve the fat)
2 1/2 cups self raising flour
1/2 tsp each of baking powder and soda
1 stick of butter- room temp.
8 TBS of cool bacon fat
3/4 cup brown sugar
3/4 cup white sugar
1 cup peanut butter
2 eggs
1 tsp vanilla
1 cup chopped peanuts
1 cup peanut morsels
turbinado sugar for garnish
Method:
Preheat oven to 375 degrees F.
Mix together dry ingredients and whisk. In a separate bowl cream butter, bacon fat and sugars until light and fluffy. Add eggs and vanilla and mix well. Add bacon and peanut butter and again mix well.
Add dry mixture, 1/3 at a time and stir until it is all incorporated. Add peanut morsels and chopped peanuts.
Drop by tablespoon or make into walnut sized balls and place on cookie tray lined with parchment paper.
Bake for about 8-12 minutes. If you like your cookies a little browner go for the 12 minutes, otherwise keep an eye on them after about 8 minutes.
I wasn’t sure about adding the bacon fat, but I used apple wood and sugar cured bacon and it added a depth of flavor that is really good. Let me know what you think when you try them!

-keep an eye on them while in the oven- they brown up quickly

The ultimate cookie for those with a bacon obsession!

If you make them, let me know what you think.  If you think I’m a little nuts-

share that, too. 

If you are embarrassed by my strange obsession- again, I’m sorry, Luke.

Palacsinta (Hungarian Dessert Pancakes or Crepes)

palicinka and peaches 001 It doesn’t really matter what language you use, these thin and flexible pancakes are always welcomed with a smile and ready appetite!

They take a while to make, because you cook each one individually- usually, by the time I’m doing the last pancakes, the rest have been gobbled down.  I try to save the last two for me, but sometimes, I only get the messed up one ( hah- purposely done!).

The recipe I’m sharing is so easy- it uses club soda for leavening and leaves out butter altogether.  Celia at Fig Jam and Lime Cordial has a wonderful recipe for Lemonade Scones using the same principle- in Australia, Lemonade= lemon/lime soda- like Seven-Up or Sprite.  Try her scones- only3 ingredients and they are great.

Here is the recipe for the palacsinta (pal- ah-sheen-ka )

Ingredients:

1 cup all-purpose (plain) flour

1 egg

1 cup milk

pinch sea salt

1/2 cup club soda or seltzer water

Vegetable oil for griddle

fresh fruit or preserves

confectioner’s sugar or cinnamon sugar for garnish

palicinka and peaches 005

Method:

Stir flour into a bowl.  Add egg, milk and salt.  Beat gently until smooth.  Add seltzer or club soda.  Beat batter with wooden spoon until smooth.  Put batter in cool place and allow it to rest for 10 to 15 minutes.

Pour some oil into skillet and allow it to get very hot, but not smoking.  Pour in a small amount  of batter, thinly covering  bottom of pan.  Cook in hot oil until crisp.  Turn pancake over and fry on other side.  Add oil as necessary.  If batter begins to thicken, thin it with a small amount of club soda.

Spread pancakes with your favorite preserves, or you can use fresh fruit- I used sugared peaches on ours.  They may be rolled up or folded in half.  Sprinkle pancakes with  icing/powered sugar or cinnamon sugar and enjoy!

This recipe should make 12 very thin pancakes- Palacsinta!

palicinka and peaches 002 palicinka and peaches 003 palicinka and peaches 004

Lavender- Culinary and otherwise and a recipe or two

Recipe #1 

Lavender Cookies

Ingredients

2 teaspoons culinary lavender flowers
2 cups all-purpose flour
11/2 teaspoons baking powder
1 pinch of salt
6 tablespoons butter
1/3 cup shortening
3/4 cup sugar
1 egg
1 tablespoon milk
1 teaspoon vanilla

Instructions

Pre-heat oven to 375ºF.
Stir together flour, baking powder and a pinch of salt. Set aside.
Beat butter and shortening for 30 to 60 seconds. Add sugar and lavender buds. Beat till fluffy. Beat in egg,
milk and vanilla. Add the dry ingredients to the mixture. Beat until well-combined.
Drop teaspoonfuls of dough onto an ungreased cookie
sheet about 2 inches apart. Bake for about 10 minutes or until golden-brown. Serve with hot tea.

………………………………………………………………………………………………………..

Sorry – no picture to go with that one.  It is too hot to bake in the oven, today.

And I have heard some people say recently that eating lavender was not appealing to them.  So, I didn’t want to push the matter, but I thought I’d look into the use and cultivation of culinary lavender.  And I think it may be that all culinary lavender is not equal.

In order for lavender to be sold for culinary purposes, it has to be grown as an agricultural crop- (human safe insecticides and fertilizers, etc)  and it has to be harvested and processed differently than lavender used for aromatic purposes.

That is all well and good ( and expensive)- but I wanted to come up with my own harvested culinary lavender, and that is where I discovered some things on my own.


lavender and Aiden 008

Lavender grown in your own hedge or bed is acceptable for culinary use.

As long as you don’t treat it with insecticides or sprays.  And it is in the harvesting that the distinct difference can be seen.


lavender and heirloom tomatoes 010

dried stem of lavender

As you can see from this single stem above, there are several components to the lavender flower.  The head or spike above contains many flowers or corollas.  In order to use the flowers without overpowering your recipe, you must remove the flower from the calyx.

 lavender and heirloom tomatoes 011 lavender and heirloom tomatoes 012

lavender florets or corollas

Once separated, save the calyx for use in sachets or potpourris-

lavender and heirloom tomatoes 004

this is painstaking and patient work- I found doing it when my husband watched baseball worked for me- it takes about as long as a baseball game lasts to get more than a few tablespoons of usable lavender flowers.

lavender and heirloom tomatoes 007

lavender and heirloom tomatoes 009

flowers and calyx- calyx alone- flower or corolla

Look at the difference in just appearance.  The scent is mainly contained in the calyx and the flowers fragrance is much more subtle.  The flowers also have the bluest appearance of the three.

I also crystalized some of the fresh flowers.  I usually do violets in the spring, so I thought it wouldn’t be too difficult to adapt that process to lavender florets.

HAH!!

It was ridiculously hard.  I managed to get eight florets done in a half an hour.

lavender and heirloom tomatoes 019 separating the florets-

lavender and heirloom tomatoes 020 preparing the egg white-

lavender and heirloom tomatoes 033 processing the sugar to be super-fine-

lavender and heirloom tomatoes 024 tweezering the florets-

lavender and heirloom tomatoes 025 painting outside and inside with egg wash-


lavender and heirloom tomatoes 026 coating with sugar-

lavender and heirloom tomatoes 030 drying and baking the florets

in a cool oven-

(sorry, I forgot to take a picture of the baking stage! 🙂

lavender and heirloom tomatoes 031 and finally attaching to sugar cubes for a decorative effect. 

Here is my second recipe.

  lavender and scones 015

Welsh Scones with lavender and currants

Ingredients:

8oz. (1 cup) self rising flour

4 oz.  (1 stick) butter, cold

pinch of sea salt

4 oz. (1/2 cup) dried currants

1 tsp. lavender,culinary, flowers only

2 TBS. fine sugar

1 egg

1 TBS buttermilk

more sugar for the topping.

lavender and scones 001 lavender and scones 002 lavender and scones 003

Cut butter into flour until looks like corn meal-


lavender and scones 004 add salt, currants, lavender, and sugar.

lavender and scones 005 Stir so that currants are coated with flour and not in clumps.

lavender and scones 007 lavender and scones 008

Add egg and buttermilk and stir gently, until completely moistened.

lavender and scones 009 Dump out onto pastry board and pat gently into a 9 x12 rectangle and cut into diamond shapes.

Then put onto a medium hot griddle  and cook until slightly browned on one side.lavender and scones 010 lavender and scones 011

Turn over and cook on the other side, sprinkling a little sugar on top.

lavender and scones 014 lavender and scones 013

These are so light and delicious!

Very More-ish as my friend, Celia, says!

I think the flour is just there to hold the butter into an edible shape, really!

These have been called Welsh Scones, Griddle cakes, and Singin’ Hinnies-

I call them magnificent.

I’ve never had a scone that topped these for lightness or flavor.

You can leave out the lavender if you like, but make these scones.

You won’t be sorry.

Heirloom tomatoes and a Salsa Recipe…

heirloom tomatos and salsa 001

Growing up in the greenhouse business, I didn’t get a lot of exposure to heirloom tomatoes.  Our business was to sell the best growing and producing vegetables- and in the late fifties and sixties (1950’s-1960’s) that meant hybrids.  We had Marglobes and Rutgers, Jubilee, Big boy, Early girl- all hybridized to give large, virtually seedless, and consistent fruit.  The idea was not to preserve the past, but to improve the tomato!

That has changed in these times of organic, local, and heritage vegetable consumers.  Now there is a great emphasis on the old stock of tomatoes and there are businesses that only sell heirloom seeds – which I like- but there is also the question on the use of these tomatoes- some of which have strange shapes that make cutting difficult. 

lavender and heirloom tomatoes 001

There is also the dense center vein and the blossom cavity at the bottom of the heirloom beefsteak tomato that makes using them a challenge.

Cutting these areas out greatly diminishes the usablility of the heirlooms- you sometimes end up with only half of the vegetable that can be used in a recipe.

I have found that the flavor and the historical romance is worth the inconvenience of the waste- and have found a way to utilize even the “wastage” by cooking them up into a sauce that can be used in soups or spiced up with herbs, onions and garlic to make into a pasta sauce.  If you are making a salsa, use the pretty part of the tomato for your recipe and save the cut away portions to cook down later.

heirloom tomatos and salsa 002

For this salsa recipe, I used these tomatoes, pepper, and onion.

Normally, I would use jalapeno peppers, but this yellow pepper was supposed to be sweet- and when I cut into it to use for a different recipe, the veins and smell told me otherwise.  One touch of my finger to my tongue gave the secret away completely- HOT!!- very HOT!   So I decided to use it in my salsa!

I had  two red tomatoes and many more orange and yellow- so my salsa is more in shades or yellow, orange, green and red- rather than the typical red and green variety.

Ingredients:

1 large hot pepper, or several small jalapeno peppers, diced small

3 or 4 tomatoes, chopped

1 medium sweet onion, diced small

1 large handful cilantro, chopped finely

juice of 1 lime

salt and pepper, to taste

Chop everything up to a uniform size- I usually leave the tomatoes slightly larger because I like a bigger bite of tomato.

heirloom tomatos and salsa 003

Mix vegetables up together, add juice and stir well.

Get out a tortilla chip and taste, add salt and pepper according to your pleasure- and enjoy!

Save up your tomato scraps until you get at least 1 1/2 cups (or you can supplement with a whole tomato to expedite your sauce) and then cook down in a saucepan with about 1/2 cup water added.  Add oregano, basil, garlic, sauteed onions, balsamic vinegar, salt, pepper to taste and you have a fresh made pasta sauce.  Bring sauce to a slow boil- bubbles will form and pop slowly within your sauce and it will thicken slightly after being reduced- about 1 hour cooking time.

( If you like, you can run the sauce through a sieve to get the pulpy and dark tomato parts out- but they aren’t really noticeable once it is all cooked down and I usually let them add to the slight texture of this homemade sauce.)

Rhubarb Custard pie- recipe

rhubarb pie and pony bread 003

I’ve had plain rhubarb pie.

I’ve had strawberry-rhubarb pie.

And they are really good.

But rhubarb custard pie is what I think of when you mention rhubarb pie to me.

My mother always made it with the custard- and it is perfect for a foil to the strong flavor of the rhubarb.  The tart flavor of rhubarb is tamed or modified by the sweet custard and you have perfection sitting on your plate.

It can be made without a top layer, since you already have the custard going on, but I like the look of a loose lattice top crust with the bubbly rhubarb pink juices staining the crust and gourmet sugar twinkling on top.

rhubarb pie and pony bread 004

Twinkle * Twinkle * Twinkle * Twinkle* Twinkle*

This is really a simple pie to make and it brings back accolades of praise and happiness in your family.   Try it- you will love it.

Ingredients:

1 1/2 cups sugar

1/4 cup flour

dash salt 

1/4 tsp. nutmeg

3 eggs, beaten

4 cups 1″ slices of rhubarb

1 TBS butter

pastry for double crust pie **

Roll out pastry for bottom and fit into pie plate.  I use a glass pie pan because it gives you a good indication of the even browning on the bottom crust.

Mix together sugar, flour, salt and nutmeg and stir into rhubarb until it is well coated.  Pour beaten eggs over mixture and stir well. 

Pour mixture into pie plate- I like to make two smaller, thinner pies- but this will make one large deep dish pie.

Dot butter over the top of pie.

Roll out second crust (top) and cut into strips and lay them on top of pie, weaving them into a lattice.rhubarb pie and pony bread 001

Over and under, gently lifting up the pastry slices to form  loosely woven top crust. 

Then sprinkle with large gourmet  sugar crystals and bake for 50 minutes at 400 degrees F. 

I cover the crust with aluminum foil for the first 4o minutes so the crust doesn’t get too brown,  taking the foil off for the last 10 minutes brings it to a lovely golden brown.

 rhubarb pie and pony bread 002

**Double crust pie dough

2 1/2 cups pastry or AP flour

1 cup cold butter

1/2 tsp salt

1/4 to 1/2 cup ice cold water

Using either a pastry blender or food processor, work butter into flour and salt mixture until it is well distributed and looks more like the texture of meal.  Add water and gently mix together until it becomes a ball.  Divide in half and press lightly into a disk and then place in a bag and refrigerate for at least 30 minutes.

The custard will form whilst the pie is baking and will be a rich and wonderful base to the tart rhubarb.  This recipe has been in my family for at least the past 60 years and this pie never fails to bring smiles of happiness to every face.

Enjoy!